Designing, implementing, and evaluating a functional Storage Area Network (SAN) using consumer-grade hardware and open-source tools.
01. Context & Problem Statement
During my first personal project meeting, one of my mentors explicitly stated that a standard NAS (Network Attached Storage) project would not be sufficiently challenging for Semester 6. A NAS operates at the file level, introducing overhead that makes it not optimal for enterprise virtualization workloads.
The Challenge: How can I design, implement, and validate a functional SAN using only hardware I have at home, while proving its superiority over NAS in performance?
02. Hardware Main Components
The environment was built to simulate a realistic "free" enterprise scenario, reutilizing devices I already owned.

| Device | Role | Configuration |
|---|---|---|
| Intel NUC | iSCSI Target | i5, 8GB RAM, Ubuntu Server 24.04 |
| 1TB HDD | Physical Storage | USB 3.0 Expansion Drive |
| Netgear GS105E | Managed Switch | VLAN 10 (Ports 2-4) / VLAN 1 (Ports 1,5) |
| Uni Laptop | Client (Initiator) | Windows 11, Microsoft iSCSI Initiator |
03. The Setup: Starting clean
I started by restoring my Intel NUC to factory defaults. It had been used as a home lab before, but I needed to start from zero to document the process accurately.
Hardware Upgrade
I swapped my old Linksys PoE+ switch for a Netgear GS105E. This was beneficial to me because it supports 802.1Q VLAN tagging, which allows me to segment the network properly later.
Fresh Install & Mounting
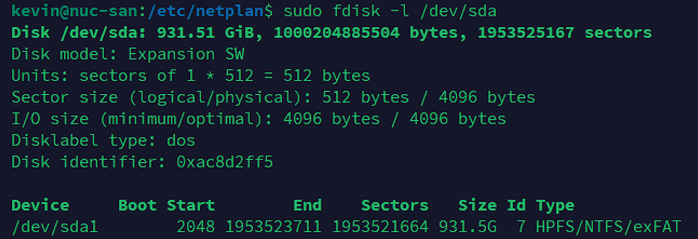
I installed Ubuntu Server 24.04.3 LTS via a bootable USB created with Rufus. During installation, I set the static IP to 192.168.2.200. After booting, I plugged in the 1TB drive.
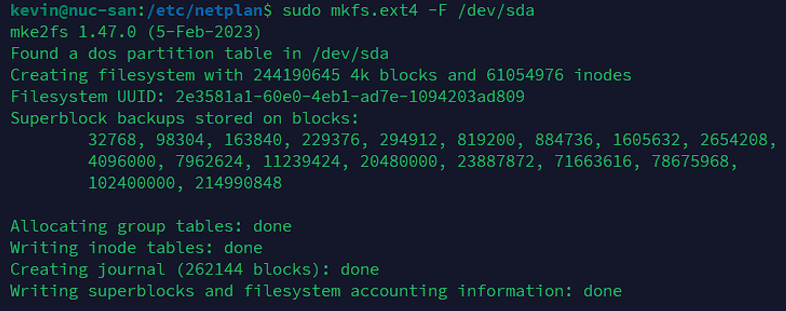
I ran sudo fdisk -l /dev/sda and saw it had an old NTFS partition. I decided to wipe it.
04. iSCSI Implementation
Installing the iSCSI Target
Now, I have to install the iSCSI Target into the NUC. targetcli normally saves its configurations in /etc/target/saveconfig.json.
With this, the service will be running and the configs will be saved.
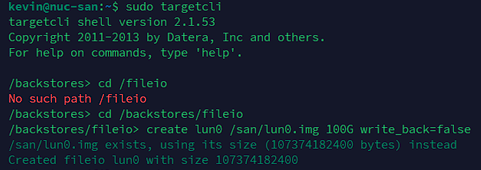
Creating the 100 GB LUN
After that, we have to create the 100 GB LUN, that’s where the virtual disk of the SAN will serve the other devices. A LUN is a Logical Unit Number, the block device the iSCSI presents.

Here we verify that it is working:

Target Configuration
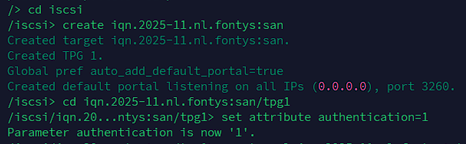
I utilized the Linux-IO (LIO) stack via targetcli-fb to map this new file as a storage object.

05. Chap Problems & Solutions
This was the hardest part of the implementation. Enterprise storage requires authentication, so I attempted to enable Mutual CHAP (where both client and server verify each other).
The Failure: My initial attempts failed. Windows 11 refused to connect. I discovered two issues:
- My password was 21 characters long (too long for some initiators).
- Windows 11 has a known bug with Mutual CHAP in the Microsoft Initiator.
The Fix: I switched to Unidirectional CHAP and shortened the password to 12 characters.
Phase 1: Configuration on the NUC
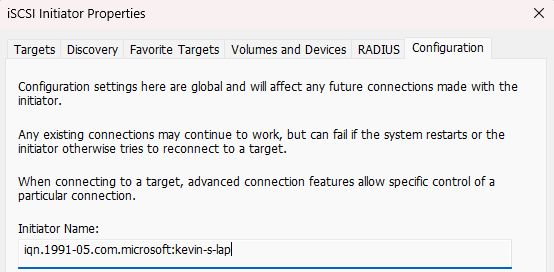
Win + R, type iscsicpl, and check the Configuration tab to copy the exact Initiator Name.

Phase 2: Connect the Windows Client
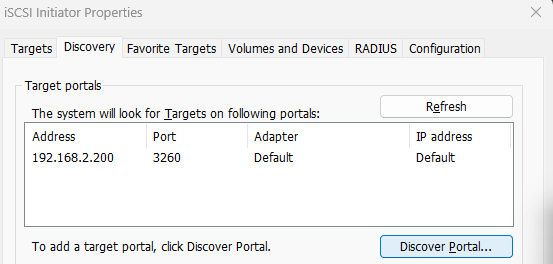
With the Target ready, I went back to the iSCSI Initiator (`iscsicpl`). I navigated to the Discovery tab, clicked Discover Portal, and added the IP address of the NUC (`192.168.2.200`) leaving the port as default.
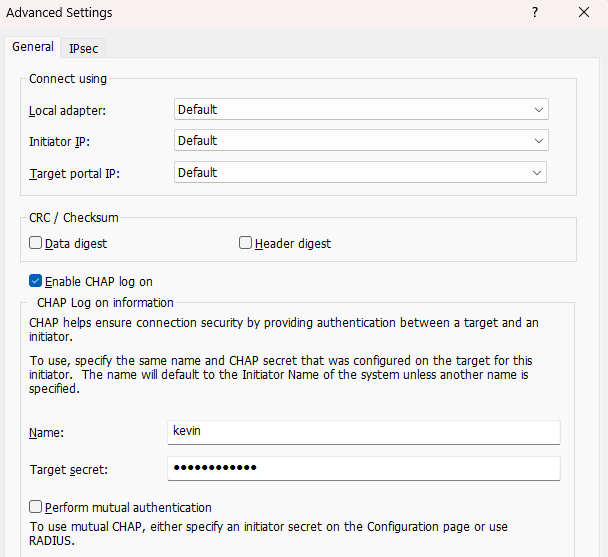
After discovery, I went to the Targets tab, selected my SAN, and clicked Connect. I opened the Advanced settings and checked Enable CHAP log on to input my credentials.
Phase 3: Initializing the Disk
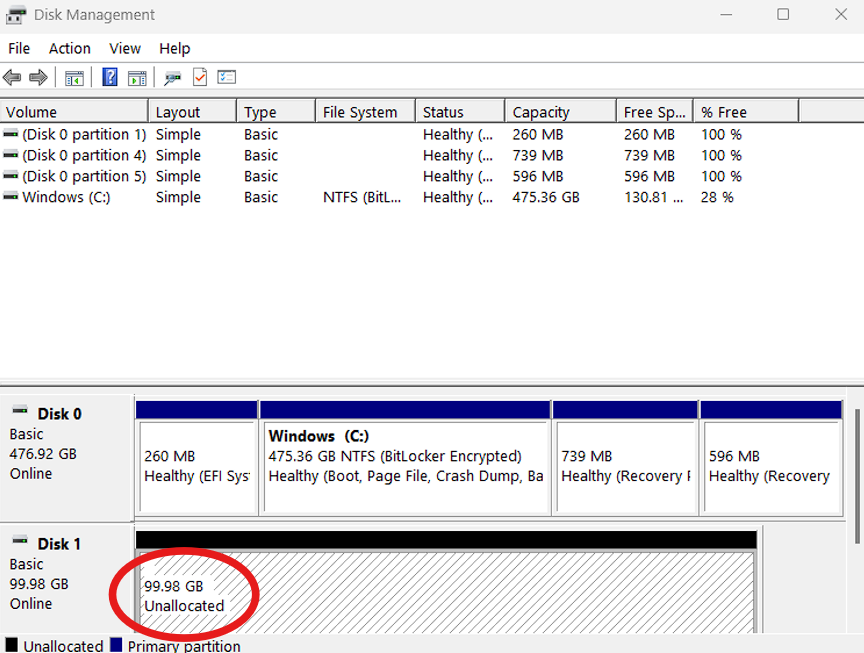
Once the connection was successful, I pressed Win + R and typed diskmgmt.msc to open Disk Management. The unformatted disk appeared immediately as "Disk 1".
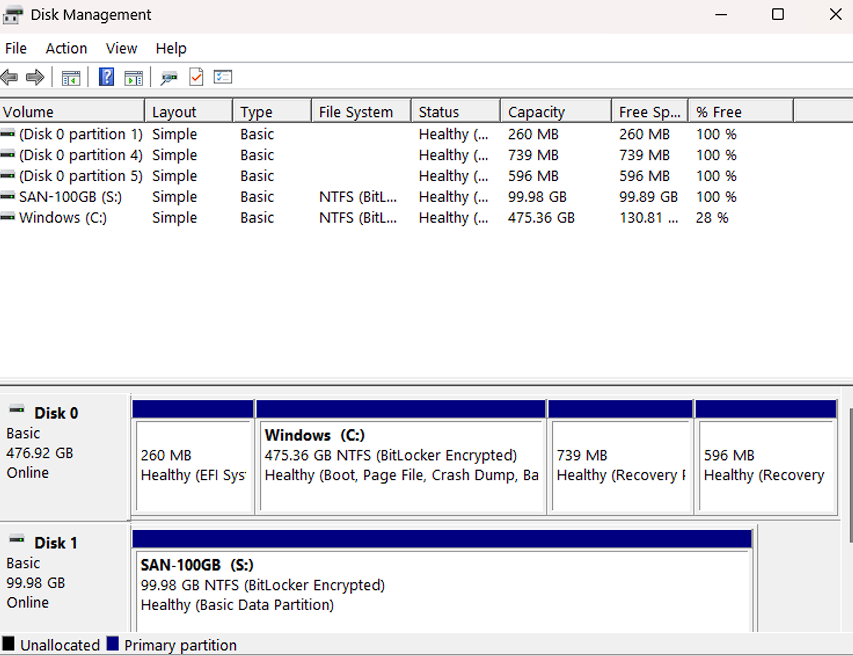
I initialized it as GPT and formatted it as NTFS (Volume Label: SAN-100GB).

06. From Homelab to Enterprise
While this project successfully creates a functional SAN with consumer hardware, it's important to understand how it differs from a true enterprise-grade solution. This section analyzes the gap between our homelab setup and a production data center environment.
Business Goals of a SAN
An enterprise SAN aims to achieve several key business objectives, which this project simulates:
- High Availability: Ensuring data is always accessible with minimal downtime. Our block-level access helps, but the single hardware node is a bottleneck.
- Disaster Recovery: Protecting against data loss. We've used software-level snapshots and backups.
- High-Performance Storage: Delivering fast, low-latency access for demanding applications like virtual machines and databases.
- Secure Traffic: Isolating storage data from the general network to maintain integrity, which we achieved with VLANs.
Gap Analysis: Homelab vs. Enterprise
Here’s a comparison of our project's components against enterprise standards, highlighting the key differences and how to close them.
| Component | Our Homelab Setup (Baseline) | Enterprise Standard (Target) | The Gap & How to Bridge It |
|---|---|---|---|
| Storage Media | External USB 3.0 Hard Drive | Internal SAS or NVMe SSD Array | Gap: Our USB drive has a significant write bottleneck (around 9 MB/s). Solution: Use internal SSDs for much faster performance. |
| Compute/Target | Single Intel NUC (i5, 8GB RAM) | High-Availability (HA) Cluster | Gap: Our single NUC is a single point of failure. Solution: Use a dual-controller setup where a second machine can take over instantly if the first one fails. |
| Network Fabric | 1 Gigabit Ethernet | 10/25 Gigabit Ethernet or Fibre Channel | Gap: Our network maxes out at around 117 MB/s. Solution: Upgrade to a 10GbE network for significantly higher throughput. |
| Security | Unidirectional CHAP | Mutual CHAP + IPsec Encryption | Gap: Windows 11's iSCSI tool has limitations. Solution: Use Linux clients, which fully support Mutual CHAP for better security. |
| Redundancy | Single Disk (No hardware redundancy) | Hardware RAID 10 | Gap: If our single disk fails, all data is lost. Solution: Use a RAID 10 array, which mirrors and stripes data across multiple disks for both speed and protection against disk failure. |
| User Capacity | Designed for a single user or a very small number of simultaneous connections. | Can support hundreds or even thousands of simultaneous users. | Gap: Our setup lacks the I/O operations per second (IOPS) and network bandwidth to handle multiple users. Solution: Enterprise SANs use powerful controllers, more RAM, and faster networking to manage a high number of concurrent I/O requests. |
Why These Enterprise Standards Matter
- Dual-Port SSDs & Active-Active Controllers: Enterprise systems use special SAS drives that can be accessed by two controllers at the same time. This, combined with an "Active-Active" controller setup, eliminates any single point of failure, ensuring the storage is always online.
- 10GbE+ Networking: As our benchmarks showed, a 1GbE link is easily saturated. High-performance storage requires a faster network to prevent bottlenecks.
- Mutual CHAP: This two-way authentication is critical in enterprise environments to prevent unauthorized devices from pretending to be a legitimate storage target.
- Hardware RAID 10: For applications that need high I/O performance and strong data protection (like databases or email servers), RAID 10 is a popular choice. It provides excellent speed and can withstand disk failures without data loss.
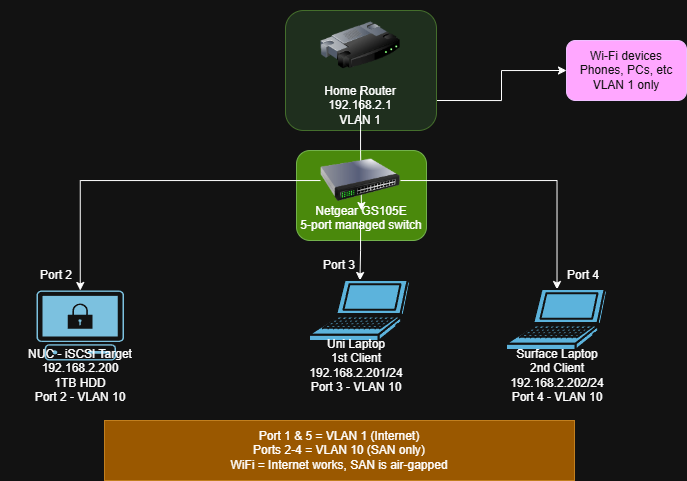
07. VLAN Security
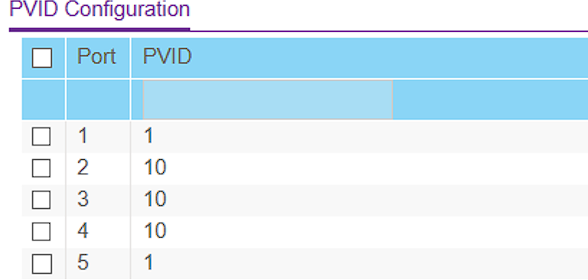
Authentication was not enough for me. I wanted to add a network isolation. I accessed the Netgear switch interface (found at 192.168.2.4) and configured 802.1Q Advanced VLANs.
- VLAN 1 (Home): Ports 1 & 5 (Router Uplink).
- VLAN 10 (SAN): Ports 2, 3, 4 (NUC & Laptops).

However, setting membership isn't enough. I also had to configure the PVID (Port VLAN ID). This ensures that any traffic coming from my laptop (which doesn't send VLAN tags) is automatically tagged as VLAN 10 by the switch.
Result: When my laptop is on Wi-Fi, the SAN IP 192.168.2.200 is unreachable. It only becomes visible when physically plugged into ports 2-4. This effectively "air-gaps" the storage traffic from the home network.
08. Benchmarks
I ran CrystalDiskMark 9.0.1 (4GiB test file, 5 runs) to compare the iSCSI SAN against a traditional NAS setup running on a separate NUC with an internal SATA HDD.
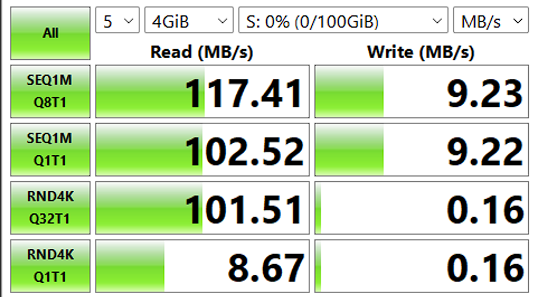
| Metric | iSCSI SAN (Block) | NAS (File) | Analysis |
|---|---|---|---|
| Seq. Read (Q8T1) | 117.41 MB/s | 117.52 MB/s | Tie: Both saturated the Gigabit Ethernet link. |
| Random Read (4K) | 101.51 MB/s | 11.25 MB/s | SAN Wins (~9x): Massive advantage for VM booting. |
| Random Write | 0.16 MB/s | 9.05 MB/s | NAS Wins: Internal SATA vs USB Overhead. |
Detailed Analysis
The NAS looks better on the sequential write because it uses internal SATA. On the USB HDD (used for the SAN), there is a translation layer which makes the sequential write of the HDD slower.
The good thing is, the random read is 9 times faster on the SAN. That’s the block-level advantage: Windows can optimize I/O way better with iSCSI than with SMB/NFS, making it far superior for latency sensitive workloads like virtualization in Proxmox, Hyper-v or VMware
09. Future Roadmap
The current implementation is functional and secure for Windows clients. But, to fully validate the SAN's versatility as an enterprise solution, the following steps are planned as a private continuation of this project: